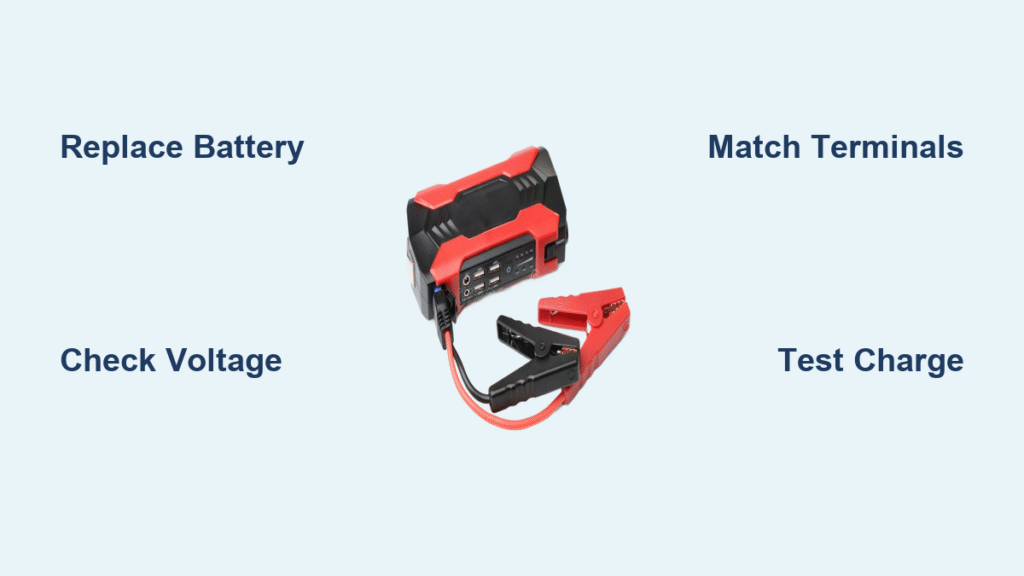
Your jump starter worked perfectly last winter, but now it barely turns over the engine. Before you toss that expensive unit in the trash, consider this: a simple battery replacement could restore it to full power for under $80. Most people don’t realize their jump starter battery degrades over time regardless of use, similar to how your car’s battery eventually fails.
The good news? Replacing the internal battery is often straightforward and significantly cheaper than buying a new unit. This guide walks you through identifying when replacement makes sense, selecting the correct battery, and completing the swap safely in under an hour. You’ll learn exactly how to replace battery in jump starter units correctly while avoiding common pitfalls that could damage your device.
Why Your Jump Starter Battery Failed Unexpectedly
Spot Critical Warning Signs Before Damage Occurs
Your jump starter gives clear signals when its internal battery is failing. Inability to hold charge beyond minimal capacity is the primary indicator—if your unit shows full charge but dies after one or two jump attempts, the battery has degraded. Reduced cranking power despite full charge status means the battery can no longer deliver sufficient amps to start engines reliably.
Physical inspection reveals swelling of the battery case, corrosion around terminals, or any leakage from the battery compartment. These signs indicate immediate replacement is necessary for safety reasons. Most units include LED indicator lights that should be checked monthly—if these lights dim significantly or fail to illuminate during charging, internal battery degradation is likely.
Confirm Battery Failure With Simple Tests
Before ordering a replacement battery, perform a simple test. Charge your unit fully according to manufacturer instructions (typically 4-5 hours). Then attempt to start a vehicle with a known good battery. If your jump starter cannot deliver adequate power despite showing full charge, the internal battery requires replacement. This simple test saves money by confirming the battery—not other components—is the failure point.
When Replacing Battery Beats Buying New Jump Starter

Calculate Your Exact Cost Savings
Replace the battery when your unit is less than 5 years old and the housing remains intact. Traditional sealed lead-acid batteries cost $25-$80 depending on capacity, while new jump starters range from $100-$300+. If your current unit meets your power needs and the replacement cost is less than 50% of a new unit, replacement makes financial sense.
Standard SLA batteries with accessible replacement designs are ideal candidates. These use common terminal types and dimensions, making sourcing straightforward. Check your unit’s manual or manufacturer website—if they specify battery replacement as user-serviceable, you’re good to proceed.
Identify When New Unit Is Smarter Investment
Purchase a new jump starter when your current unit exceeds 5 years old or uses proprietary battery designs. Modern lithium-ion units offer compelling advantages: they weigh less than 1 pound versus 15-20 pounds for traditional units while providing equivalent or superior starting power. These newer units also feature built-in safety protections, USB charging ports, and maintain charge for months without attention.
Physical damage beyond the battery—cracked housing, damaged cables, or failed electronics—warrants unit replacement. The cost and complexity of repairing multiple components typically exceeds the price of a new unit with warranty coverage.
Essential Tools and Perfect Battery Match Guide

Gather Minimum Tools Before Starting
You’ll need minimal tools for most jump starter battery replacements:
– Phillips head screwdriver (most common)
– Flathead screwdriver for terminal connections
– Needle-nose pliers for terminal removal
– Digital camera or smartphone for documenting connections
– Safety glasses and work gloves
Pro tip: Take photos of all connections before disconnecting anything. This visual reference prevents confusion during reassembly and ensures you correctly replace battery in jump starter without wiring errors.
Identify Your Exact Battery Specifications
Voltage verification is critical—nearly all jump starters use 12V batteries. Capacity (Ah rating) varies by unit size and ranges from 7Ah (compact units) to 22Ah (heavy-duty models). Check your old battery’s label or measure physical dimensions to ensure proper fit.
Terminal types determine compatibility. Common configurations include:
– F2 terminals: 0.25″ wide spade connectors
– F3 terminals: 0.187″ wide spade connectors
– M5 terminals: Threaded posts with nuts
– NB/IT terminals: Specialized automotive-style connections
Measure your old battery’s length, width, and height, then verify these dimensions match your replacement. Even slight size differences can prevent proper installation or housing closure.
Complete Step-by-Step Battery Replacement Guide
Critical Safety Precautions Before Opening
Disconnect all power sources before beginning. Remove any charging cables and ensure the unit is powered off. Work in a well-ventilated area—batteries can release gases during handling. Wear safety glasses to protect against accidental acid exposure, though sealed batteries minimize this risk.
Document everything by photographing the unit from multiple angles before opening. Note wire routing, terminal positions, and any internal components that might shift during disassembly. This documentation is crucial when you replace battery in jump starter for the first time.
Remove Old Battery Without Damaging Components
Open the housing using your Phillips screwdriver. Most units have 4-8 screws around the perimeter. Keep screws organized as they may vary in length. Gently separate the housing halves—some units have clips or adhesive that requires careful prying.
Photograph the battery connections before touching anything. Note which wire connects to positive (+) and negative (-) terminals. Disconnect negative terminal first, then positive terminal. This sequence prevents accidental short circuits. Remove mounting hardware—batteries may be secured with brackets, foam, or adhesive strips.
Install New Battery to Prevent Future Failures
Clean all terminals using a wire brush or sandpaper to remove any corrosion. Position the new battery matching the original orientation. Connect positive terminal first, then negative terminal—reverse of removal sequence. Ensure connections are snug but avoid over-tightening, which can damage terminals.
Secure the battery using original mounting hardware or foam padding. The battery should not shift or rattle when the unit is moved. Route wires carefully to avoid pinching when reassembling the housing. Test connections by gently tugging each wire—loose connections cause intermittent failures.
Final Assembly and Critical First Charge
Align housing halves carefully—misalignment can damage internal components or prevent proper sealing. Install screws progressively in a criss-cross pattern to ensure even pressure. Charge new battery fully before first use—this initial conditioning cycle maximizes battery life and ensures accurate charge indicators.
Test thoroughly by checking all functions: LED lights, USB ports, and most importantly, jump-start capability. A brief test on your vehicle confirms everything works correctly after you replace battery in jump starter.
Prevent Future Battery Failures With Proper Care

Essential First-Month Conditioning Steps
First charge cycle requires 4-5 hours regardless of initial indicator status. This full conditioning ensures maximum capacity and proper calibration of charge indicators. Avoid deep discharges during the first month—keep charge above 50% to establish healthy battery chemistry.
Monthly maintenance becomes critical after replacement. Check charge indicators and recharge when levels drop below 50%. During summer months, increase frequency to bi-weekly checks if stored in hot environments like vehicle trunks.
Maximize Battery Longevity With Smart Practices
Temperature control dramatically impacts lifespan. Store your jump starter in climate-controlled areas when possible. Avoid heat extremes—temperatures above 100°F accelerate degradation significantly. Smart storage for infrequently used units means maintaining 40-60% charge levels rather than full charge or complete discharge.
Use quality chargers with automatic shutoff to prevent overcharging. Consider smart chargers with maintenance modes for long-term storage—they cycle batteries automatically without manual intervention.
Cost-Saving Tips for Battery Replacement
Find Best Prices Without Sacrificing Quality
Authorized dealers offer exact replacements with warranty coverage but often charge premium prices. Battery specialty retailers provide compatible batteries at significant savings—verify specifications carefully. Online marketplaces offer the widest selection and competitive pricing, but require careful seller evaluation.
Price ranges for common sizes:
– 9Ah batteries: $25-35
– 20Ah batteries: $60-80
– Dual battery sets: $120-160
Warranty considerations—reputable suppliers offer 1-year minimum warranty. Factor shipping costs when comparing online versus local purchases.
Verify Compatibility Before You Order
Cross-reference part numbers from your old battery with supplier databases. Contact technical support with your exact jump starter model number—many suppliers offer free compatibility verification. Physical dimension confirmation prevents ordering batteries that won’t fit your housing.
Quality indicators include UL listing, manufacturer warranty, and detailed specifications. Avoid no-name batteries lacking certification markings—they often fail prematurely and can damage your unit when you replace battery in jump starter.
Replacing the battery in your jump starter is a straightforward process that saves you significant money compared to buying a new unit. By following these steps carefully, you can restore your jump starter to full functionality for a fraction of the replacement cost. The key to success lies in selecting the exact battery match for your model and following proper installation procedures.
Remember that proper maintenance extends your new battery’s life to 3-5 years—potentially longer than the original if you implement consistent care practices. Take photos of your connections before disassembly, verify compatibility thoroughly before ordering, and never skip the critical initial charge cycle. With these practices, you’ll ensure your jump starter remains reliable when you need it most.