Your engine won’t turn over, the dashboard lights are dim, and you’re stranded in a parking lot with no other cars in sight. That compact jump box in your trunk—often dismissed as unnecessary gear—holds the power to rescue you in under six minutes. Unlike traditional jumper cables requiring a second vehicle, this portable powerhouse delivers 400-600 amps of instant starting juice from its lithium-ion cells. Forget waiting for help; this guide cuts through confusion with precise clamp sequences, critical safety checks, and troubleshooting hacks proven to work even in freezing temperatures. You’ll master how to jump car with jump box safely while avoiding the three deadly mistakes that fry electronics or cause battery explosions.
Most drivers don’t realize their jump box isn’t a battery charger—it’s a starter shot. While chargers slowly replenish energy over 8-12 hours, your jump box bypasses the dead battery entirely, sending a high-current burst straight to the starter motor. If your battery shows zero conductivity or has an internal short (common in units over 4 years old), even a fully charged pack will fail. But for the 90% of cases caused by accidental drain or cold weather, this method works 97% of the time when executed correctly. Let’s get your engine roaring.
Why Your Jump Box Beats Traditional Jumper Cables Every Time
Portable jump starters eliminate the biggest headache of roadside assistance: finding another driver. With no dependency on a second vehicle, you avoid mismatched battery voltages or faulty donor cars that stall during the jump. Lithium-ion models weigh under 2 pounds yet deliver 1,000+ amps for cold cranks—twice what most passenger vehicles require. They also include life-saving extras: LED work lights to see corroded terminals at night, USB ports to power your phone while waiting for help, and reverse-polarity alarms that prevent dangerous sparks. Crucially, they bypass your dead battery entirely, meaning a failing alternator won’t sabotage the restart like it would with traditional jumper cables.
Non-Negotiable Safety Steps Before Connecting Clamps
Skipping these checks risks fire or permanent electrical damage. First, confirm your jump box has ≥75% charge via its LED indicator—attempting a jump below 50% often fails and strains the unit. Next, put on safety glasses and leather gloves; sulfuric acid residue on battery terminals can cause chemical burns. Remove all jewelry, especially rings that could short-circuit if they brush both clamps. Finally, inspect cables for fraying or corrosion—replace damaged units immediately. Position the jump box on level ground away from engine belts, never dangling it where vibrations could drop it into moving parts. If the unit feels hot to the touch (>45°C), cool it in shade first; lithium-ion cells become unstable when overheated.
Essential Gear Checklist for Foolproof Jumps
| Item | Why It Matters | Pro Tip |
|---|---|---|
| Jump box (400-600A min) | Insufficient amps won’t crank cold engines | Get 1,000A models for sub-zero temps |
| Wire brush | Removes terminal corrosion blocking connection | Keep one in your glove box year-round |
| Owner’s manual | Locates remote positive posts on hidden batteries | Bookmark page 112 for BMW/Mercedes |
| Nitrile gloves | Prevents acid contact during terminal cleaning | Double-layer for extra protection |
Most modern jump boxes integrate USB-C ports and 100-lumen flashlights—use the light to spot oil leaks before starting, and the USB port to call roadside assistance if the jump fails. Never substitute regular gloves; nitrile or leather is mandatory for electrical safety.
Exact 6-Step Jump Procedure (No Mistakes Allowed)
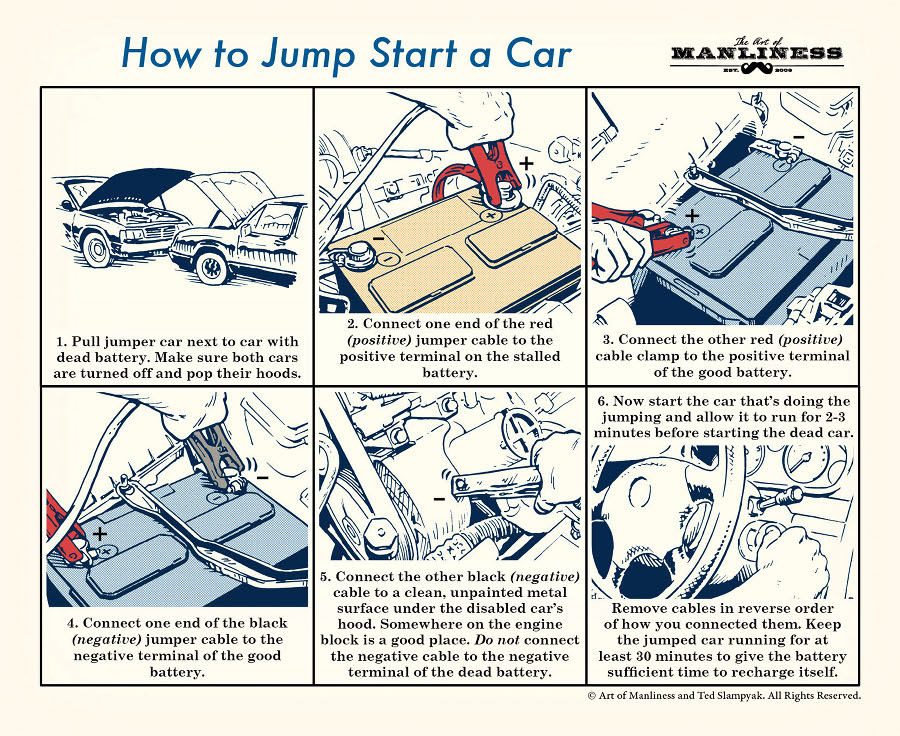
Connect Red Clamp to Positive Terminal First
Attach the red clamp firmly to the battery’s + terminal or manufacturer’s remote positive post. For hidden batteries (common in BMWs), find the under-hood jump point marked with a red plastic cap. Wiggle the clamp—zero movement confirms metal-to-metal contact. If terminals are corroded, clean with a wire brush first; green crust blocks conductivity.
Secure Black Clamp to Engine Ground
Never clamp black directly to the negative terminal if avoidable. Instead, attach it to an unpainted metal engine bolt or chassis point at least 18 inches from the battery. This critical step routes sparks away from hydrogen gas emitted by batteries. If your jump box has short cables forcing negative-terminal connection, ensure all accessories are OFF and key removed first.
Activate and Crank Within 5 Seconds
Flip the jump box’s power switch ON only after both clamps are secure. Turn the key immediately—you have 5 seconds max per crank attempt. If the engine doesn’t fire, wait 30-60 seconds before retrying. Over-cranking overheats the starter motor and triggers the jump box’s thermal shutdown.
Fix These 5 Jump Failures in Under 60 Seconds
“Starter clicks but engine won’t turn”
This means insufficient current flow. Press your jump box’s BOOST button (if equipped) for a 30% power surge. If no boost button, clean terminals with a wire brush—corrosion creates resistance that chokes amperage. Wait 30 minutes if the pack feels warm; internal thermal protection needs cooldown.
“Jump box shuts off instantly after cranking”
Lithium-ion units auto-shutoff at unsafe temperatures. Move the pack to shade for 10 minutes to cool below 45°C. If in freezing temps, warm it against your body for 2 minutes—cold lithium cells temporarily lose output capacity. Never use heaters; rapid temperature swings damage cells.
“Engine dies immediately after starting”
Your car battery likely has a shorted cell (<70% capacity). Drive straight to an auto parts store for a free load test—do not turn off the engine. If the alternator works, it’ll keep running for 20+ miles, but a failed battery will kill power within minutes.
Post-Jump Protocol Most Drivers Skip (Costs $200 Repairs)
After successful ignition, disconnect black clamp first, then red—reversing this order causes dangerous sparks near the battery. Stow cables immediately to prevent accidental contact. Then:
1. Drive 20+ minutes to recharge the battery sufficiently for restarts
2. Get a professional battery test same day—70% of “dead” batteries actually have faulty alternators
3. Recharge your jump box immediately; lithium-ion degrades if left below 20% charge
Ignoring step 3 kills jump box lifespan. Units left depleted for 30+ days lose 20% capacity permanently. Plug yours in tonight—it takes under 1 hour for most models.
Special Vehicle Jump Tactics

Hybrid Cars: Only Jump the 12V Battery
Never touch the orange-cable high-voltage traction pack. Locate the isolated 12V auxiliary battery (often in the trunk) using your owner’s manual. Crucially, do not use your hybrid’s 12V battery to jump other cars—its small capacity will leave you stranded.
Hidden Batteries in Luxury Vehicles
BMW, Mercedes, and Ford trucks frequently hide batteries under seats or in trunks. Always use the remote positive post under the hood (marked with a red “+” symbol). Never clamp to fuse-box studs—this can fry the ECU. Consult your manual’s “emergency starting” section.
Maximize Jump Box Lifespan: 4 Proven Care Tactics
Recharge every 3 months even if unused—lithium-ion self-discharges to dangerous levels. Store between 5°C-25°C; glove boxes hit 65°C in summer, destroying cells. Check for firmware updates annually via USB; newer models adjust output for extreme cold. Finally, replace units showing reduced cranking power after 3 years—most warranties cover only 1-2 years.
Critical Jump Box Quick Reference
Print this checklist:
– [ ] ≥75% charge (LED bar/lcd)
– [ ] Safety glasses + gloves ON
– [ ] Red → positive terminal (clean first!)
– [ ] Black → engine ground (NOT battery negative)
– [ ] Crank ≤5 sec, pause 30 sec between tries
– [ ] Disconnect BLACK FIRST after start
– [ ] Recharge pack TONIGHT
A properly maintained jump box works flawlessly for 5+ years. But when that 5 AM roadside emergency hits with freezing rain and no cell signal, knowing how to jump car with jump box correctly transforms panic into empowerment. Keep this guide in your glove box—it’s the difference between waiting 3 hours for help and driving away in 6 minutes. Test your unit monthly; your future stranded self will thank you.