
Stuck with a Dyson vacuum that won’t open to empty or access the bin? You’re not alone. Whether it’s a Dyson V7/V8/V10/V11 stick vacuum or an upright like the Ball Animal, a jammed or stuck dust bin is a common headache. The quick fix: power off, press and hold the red release button/lever firmly while gently tapping around the bin latch area; then slide the bin down to clear debris. If the latch is obstructed with hair/dust, a thin tool (like a plastic card) can help free it.
In this guide, you’ll learn all the reasons your Dyson vacuum will not open, step-by-step solutions for different models, safe ways to free a jammed latch without breaking it, and how to keep it from happening again. By the end, you’ll confidently open and empty your Dyson every time.
Common Causes of a Dyson Vacuum That Will Not Open

- Full bin compacted with fine dust: Packed debris compresses around the seal and latch.
- Latch mechanism clogged: Hair, string, and dust block the red release button/slider.
- Sticky rubber seals: Moist dust or cleaning sprays make seals tacky and grabby.
- Misaligned bin rails: The bin wasn’t fully seated on the rails, causing binding.
- Broken or bent latch spring: The red latch has lost tension or is cracked.
- Cold temperature stiffening: Plastic and rubber contract and bind in cold rooms.
- Liquid spills or damp dust: Causes clumping that locks the bin.
- Incorrect opening method: Different Dyson models open differently (triggered flap vs. sliding bin).
How to Fix a Dyson Vacuum That Won’t Open
Below are model-specific methods in order from simple to advanced. Identify your Dyson model family first.
Method 1: Quick Release and Tap (All Models)
Diagnosing the Issue
- Red latch/button feels stuck or doesn’t click.
- Bin looks overly full or dust is packed near the hinge.
Fix Steps
- Turn off and unplug the charger. Remove the vacuum from the dock. For uprights, unplug the cord.
- Hold the vacuum over a trash can.
- Firmly press and hold the red release button/lever.
– V7/V8: Pull the red top lever upward to pop open the trapdoor.
– V10/V11/V12/V15: Push the red bin release slider downward (toward the bin’s base) to open the trapdoor and slide bin off if needed.
– Uprights (Ball/Animal): Press the red button on the bin handle. - While holding the latch, gently tap the bin sides and bottom with your palm to loosen compacted dust.
- If the trapdoor cracks open slightly, gently pull it open and shake out debris.
- Close the bin firmly until it clicks.
Testing
- Reopen and close the bin again. The latch should move smoothly with a click.
Method 2: Clear Latch Obstruction (Stick Models V7–V15 and Uprights)
Diagnosing the Issue
- Latch moves partially but stops.
- You see hair or debris around the red button/slider or hinge.
Fix Steps
- Power off. Remove the wand and any attachments.
- Use a flashlight to inspect around the latch, hinge, and trapdoor edges.
- Use a plastic card, zip tie, or wooden toothpick to tease out hair/dust around the latch. Avoid metal picks that can scratch plastic.
- For stubborn grime, lightly mist a microfiber cloth with isopropyl alcohol (70%) and wipe the latch area. Do not pour liquid into the mechanism.
- Try the release again while gently squeezing the bin sides.
Testing
- Latch should travel fully and the trapdoor should swing open freely.
Method 3: Remove the Bin for a Reset and Deep Clean (V7/V8)
Diagnosing the Issue
- Trapdoor opens but bin won’t slide or you can’t access the cyclone.
- You need to clear compacted dust along the rails.
Fix Steps
- Detach the wand.
- Pull the red lever on top to open the trapdoor.
- With the trapdoor open, press the small red release catch on the front of the bin and slide the bin down and off the cyclone assembly.
- Clean:
– Use a dry brush to remove dust from the bin rails and latch.
– Wipe bin interior and seals with a slightly damp cloth; let dry completely.
– Brush dust off the cyclone shroud (do not wash the cyclone unless your model manual allows; most V7/V8 cyclones are not water-washable). - Refit:
– Align the bin rails with the guides.
– Slide up until it clicks.
– Close the trapdoor.
Testing
- Open and close the bin several times. Movement should be smooth and positive.
Method 4: Remove and Refit the Bin (V10/V11/V12/V15)
Diagnosing the Issue
- Side-mounted bin slider won’t move or the bin won’t slide off to empty.
- Slider feels gritty or jammed.
Fix Steps
- Detach the wand and any tools.
- Hold the vacuum over a trash can.
- Push the red release slider toward the bin’s base. If it resists, maintain steady pressure, then gently tap the bin sides to free compacted dust until the trapdoor pops open.
- To remove the bin: With the trapdoor open, continue pushing the red slider all the way; the bin should slide forward off the rails.
- Clean:
– Brush dust out of the rails and slider channel.
– Wipe the rubber seal and bin lip with a slightly damp cloth; let dry fully.
– Clean the cyclone shroud with a dry brush only (unless your manual states it can be washed; many V10+ cyclones are not user-washable). - Refit:
– Align bin on rails and push until it clicks.
– Close the trapdoor.
Testing
- Operate the slider several times. It should travel end-to-end and click positively.
Method 5: Upright Models (Ball/Animal/Multifloor)
Diagnosing the Issue
- Bin button on handle doesn’t release the bin from the body.
- Trapdoor won’t flip.
Fix Steps
- Unplug the vacuum.
- Lift the bin straight up by the handle while pressing the red release button. If it won’t release, gently wiggle side-to-side while pressing the button.
- With the bin removed, press the trapdoor button on the bin to open it over a trash can.
- Clean the hinge and latch with a dry brush; remove hair and threads.
- Wipe the rubber seal and the lip of the trapdoor.
- Reinstall the bin, ensuring it slides down until it clicks into place.
Testing
- Press the bin button to remove/attach smoothly. The trapdoor should open easily.
Method 6: Freeing a Stuck Seal or Moist Compaction
Diagnosing the Issue
- You used cleaning sprays, vacuumed damp debris, or the bin is sticky.
- The trapdoor partially opens but clings to the seal.
Fix Steps
- With power off, apply light, even pressure to the red latch while gently pulling the trapdoor edge with two fingers.
- If needed, use a hair dryer on low to warm the seal for 30–45 seconds. Keep 8–10 inches away. This softens tacky residue without warping plastic.
- Open and wipe all seal surfaces with a cloth lightly dampened with isopropyl alcohol; let air-dry completely.
- Optional: Lightly dust the seal with a trace of dry silicone-safe PTFE powder or cornstarch to reduce sticking. Avoid oils/grease.
Testing
- After drying, the door should swing freely and latch with a click.
Method 7: Address a Damaged Latch or Spring
Diagnosing the Issue
- Latch offers no resistance, doesn’t click, or is visibly cracked.
- Bin opens only if you manually pry the door.
Fix Steps
- Inspect the red latch and hinge for cracks.
- If broken, the bin assembly or latch component must be replaced. Dyson generally sells whole bin assemblies per model:
– V7/V8: Clear bin assembly
– V10/V11/V12/V15: Clear bin assembly with slider
– Uprights: Bin with trapdoor - Note your exact model name/number (e.g., SV12 for V10) and purchase a genuine replacement from Dyson or an authorized parts retailer.
- Fit the new bin following the removal/refit steps above.
Testing
- Operate the latch at least 10 times to ensure proper engagement.
Prevention Tips and Maintenance Advice
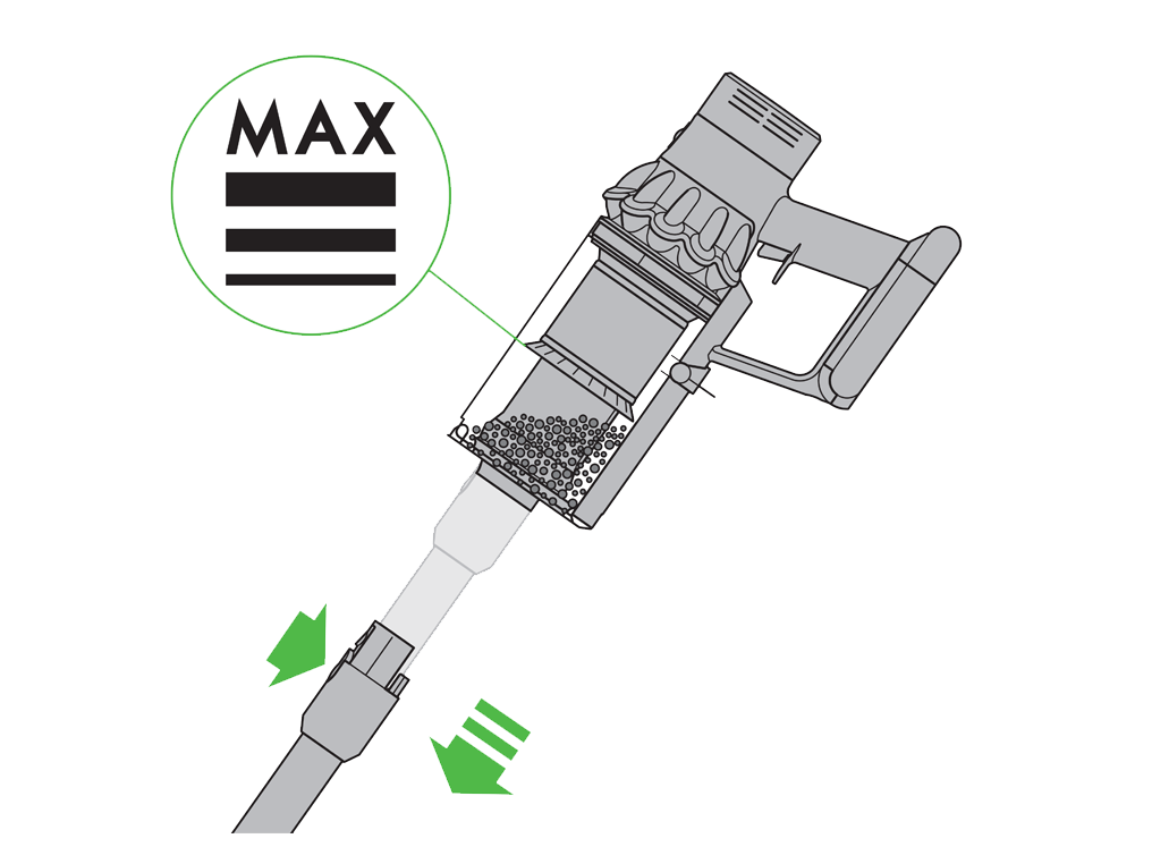
- Empty before the MAX line: Avoid compaction that binds the trapdoor.
- Keep latches clean: After every few empties, brush dust from the red latch, hinge, and rails.
- Never vacuum wet debris: Moist dust clumps and glues to seals.
- Let it cool/dry: If used in a damp area, leave the bin open to air-dry before closing.
- Store at room temperature: Avoid very cold garages that stiffen seals and plastic.
- Use the correct emptying motion: Hold over a trash can and work the lever/slider fully.
- Periodically remove the bin: A quick deep clean every 1–2 months keeps rails smooth.
Pro Tips
- Press and hold: Apply steady pressure to the red button/slider rather than jabbing it.
- Tap don’t whack: Gentle taps around the bin can free compaction without cracking plastic.
- Avoid lubricants: Oils/greases attract dust and can damage plastics. If needed, use a dry PTFE powder sparingly on seals.
- Check the shroud: Fine dust cakes on the cyclone shroud can impede debris fall; brush it gently.
- Use a soft brush: A makeup brush or small paintbrush is perfect for latch crevices.
- Model-specific motions: V7/V8 use an upward pull lever; V10+ use a forward/downward slide. Don’t force the wrong motion.
- Replace fatigued bins: If your Dyson is several years old and the door or latch is loose, a new bin assembly restores like-new operation.
When to Seek Professional Help
- The latch is broken, missing, or the spring is detached inside the mechanism.
- The bin rails or cyclone collar are warped or cracked.
- The trapdoor hinge pin is snapped or missing.
- You attempted removal and the bin won’t reseat properly.
- You suspect liquid damage inside the cyclone.
What to look for in a service provider:
– Authorized Dyson service center or certified technician.
– Genuine Dyson parts warranty.
– Transparent quote and turnaround time.
Typical costs:
– Bin assembly: $25–$80 for stick models; $40–$120 for uprights (varies by region/model).
– Labor at a shop: $40–$100 depending on complexity.
Warranty considerations:
– Dyson’s limited warranty may cover defective latches but not damage from misuse or liquid ingress. Contact Dyson Support with your serial number to check eligibility.
FAQ
Q: How do I open the bin on my Dyson V8 if the lever is stuck?
A: Power off, hold the vacuum over a bin, and pull the red top lever up firmly. If it won’t budge, use gentle taps on the bin, remove any visible hair around the hinge, and, if needed, remove the bin by pressing the small red catch with the trapdoor open to clear debris on the rails.
Q: My Dyson V10 slider won’t move. Can I force it?
A: Don’t force it. First, press steadily while tapping the bin to break compaction. If still stuck, open the trapdoor slightly, then continue pushing the slider fully to remove the bin. Clean the slider channel and rails, dry thoroughly, and refit.
Q: Can I wash the Dyson cyclone if dust is caked?
A: For most models, do not wash the cyclone body unless your manual explicitly allows it. Brush the shroud with a dry brush. Water inside the cyclone can cause blockages and damage.
Q: The trapdoor opens but won’t close fully. What should I do?
A: Check for debris on the door lip and rubber seal. Clean both, dry completely, and check the hinge pin alignment. If the door doesn’t click shut or springs open, the latch or hinge may be damaged and the bin assembly may need replacement.
Q: Why does my bin keep getting stuck after vacuuming fine dust (e.g., drywall)?
A: Fine dust compacts tightly. Empty more frequently, use a pre-filter or dust bag accessory when doing renovation cleanup, and brush the shroud after each use. Avoid overfilling to the MAX line.
Q: Is there a lubricant I can use on the latch?
A: Avoid oils and silicone sprays. If necessary, a minimal amount of dry PTFE powder on the rubber seal reduces stickiness without attracting dust. Keep powders away from the latch internals.
Q: Do cold temperatures affect opening?
A: Yes. Cold plastic and rubber stiffen and can bind. Let the vacuum sit at room temperature for 30 minutes, then try again.
Alternative Solutions
Sometimes persistent latch issues justify alternatives.
| Solution | Pros | Cons | Best For |
|---|---|---|---|
| Replace bin assembly (OEM) | Restores like-new function; straightforward | Cost vs. cleaning; must match model | Broken or fatigued latches |
| Third-party bin | Lower cost | Variable quality/fit; may void warranty | Out-of-warranty users on a budget |
| Professional service | Proper diagnosis; warranty-safe | Labor cost; downtime | Users unsure about DIY |
| Preventive deep clean kit (brushes, wipes) | Low cost; reduces future jams | Requires routine effort | Frequent fine-dust users |
Get Your Dyson Vacuum Working Again
Use these steps to open and maintain your Dyson with confidence:
– Try the quick release and tap method.
– Clear latch obstructions with safe tools.
– Remove and clean the bin and rails (model-specific).
– Warm sticky seals and clean with isopropyl alcohol.
– Replace damaged latches or the entire bin if needed.
Don’t let a stuck bin slow you down. With the right technique for your model, your Dyson vacuum will not open issues can be solved in minutes—and prevented going forward.
Have you successfully freed a jammed Dyson bin? Share your model and what worked for you to help other readers. Found this helpful? Bookmark it for next time and keep your Dyson running smoothly.