
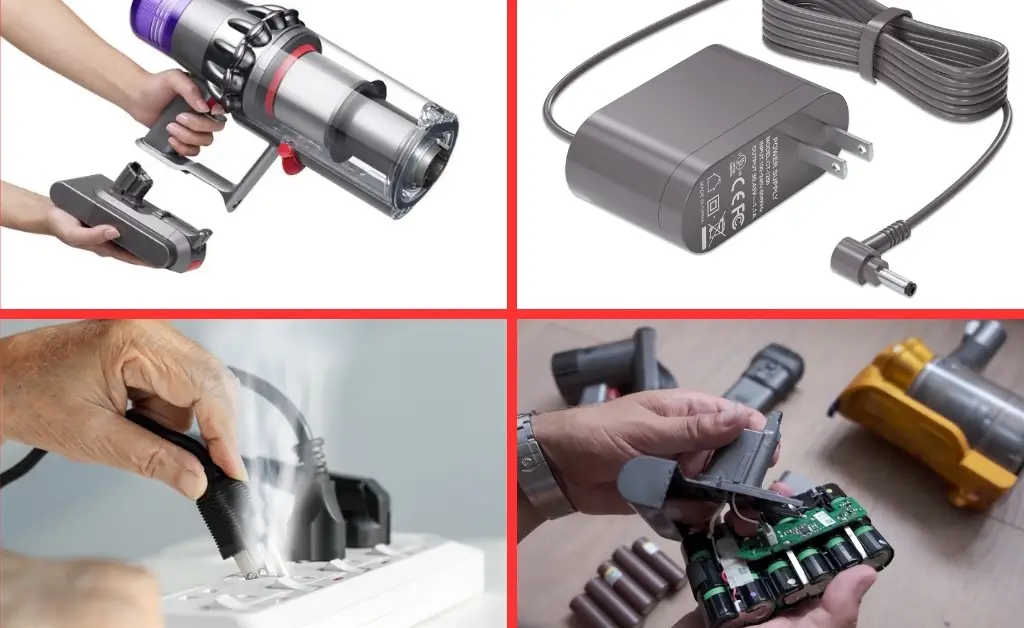
Nothing derails your cleaning routine faster than a Dyson stick vacuum not charging. Whether your Dyson V6, V7, V8, V10, V11, V12, or V15 refuses to power up, the most common quick fix is to reseat the battery and charger: unplug the charger for 60 seconds, firmly reseat the battery into the handle until it clicks, reconnect the charger to a known-good outlet, and check for the blue charging light. If there’s still no light, try a different wall outlet and inspect the cable for damage.
In this guide, you’ll learn every proven method to diagnose and fix Dyson stick vacuum charging issues—from simple checks (outlet, cable, dock) to deeper solutions (battery replacement, terminal cleaning, firmware resets on smart models). We’ll also cover model-specific tips, error light meanings, and how to prevent future charging problems. By the end, you’ll know exactly what’s wrong and how to get your Dyson charging reliably again.
Common Causes of a Dyson Stick Vacuum Not Charging

- Dead or failing battery pack (especially on older V6/V7/V8 units)
- Faulty charger or damaged cable
- Loose battery connection or misaligned contact pins
- Docking station/charging port alignment issues
- Tripped outlet, faulty power strip, or GFCI outlet reset needed
- Obstructed or dirty battery terminals
- Overheated battery triggering thermal protection
- Clogged filters or airway causing overheating and shutdown
- Firmware or electronics fault (more common on V11/V12/V15)
- Wrong/third-party charger with incompatible voltage/amps
How to Fix a Dyson Stick Vacuum Not Charging
Method 1: Quick Power Checks (2–5 minutes)
Diagnosing the Issue
- No charging light at all suggests an outlet/charger/connection issue.
- Flashing red light often indicates a battery fault.
- Flashing blue light usually indicates not charging properly; continuous blue means charging.
Fix Steps
- Test the outlet:
– Plug a lamp/phone charger to confirm power.
– Avoid power strips—plug directly into a wall outlet.
– If using a GFCI outlet (bathroom/kitchen), press Reset. - Inspect the charger:
– Look for frayed cables, bent pins, kinks, or burn marks.
– Ensure the barrel connector clicks firmly into the dock or vacuum.
– If you have a multimeter, verify output (typically ~26.1V DC for V10/V11/V15; ~21.6V systems for V6–V8 use a compatible charger). - Reseat everything:
– Unplug the charger for 60 seconds.
– Remove the battery (if removable) and reinsert firmly until it clicks.
– Reconnect charger to wall, then to vacuum/dock. - Try a different outlet:
– Prefer a different room to rule out circuit issues.
Testing
- Blue light should illuminate within 2–3 seconds.
- If no light, proceed to Method 2.
Method 2: Check Docking Station and Contacts (5–10 minutes)
Diagnosing the Issue
Wall docks can get misaligned or loose over time, preventing proper contact.
Fix Steps
- Remove the vacuum from the dock and plug the charger directly into the vacuum (if your model allows). If it charges directly but not on the dock, the dock is the problem.
- Inspect the dock contacts:
– Look for bent, tarnished, or recessed metal tabs.
– Ensure mounting screws aren’t overtightened, warping the dock. - Clean contacts:
– Important: Unplug the charger first.
– Use a dry microfiber cloth or pencil eraser to gently clean contacts on both the vacuum and dock.
– Do not use liquid cleaners on electrical contacts. - Re-seat the charger barrel plug into the dock until fully inserted—partial insertion can prevent charging.
Testing
- Dock the vacuum; watch for solid blue light.
- If still no light, continue to Method 3.
Method 3: Battery and Connection Reset (5–15 minutes)
Diagnosing the Issue
A poor battery connection or a minor control board glitch can block charging.
Fix Steps
- Remove the battery:
– On V7/V8/V10/V11/V12/V15: Remove the Torx screws (usually T8/T10) securing the battery and slide it out.
– On V6: Release the screw under the handle and the one near the battery’s base. - Inspect terminals:
– Look for corrosion, dust, or debris.
– If slightly oxidized, gently clean with a dry cotton swab. - Reseat and reset:
– Leave the battery out for 2 minutes to discharge residual power.
– Reinstall battery firmly until it clicks. - Cool-down:
– If the vacuum was warm/hot, allow 30 minutes of cooling before charging. Overheating triggers thermal protection and blocks charging.
Testing
- Plug in and check the charging light.
- If flashing red persists or no light appears, go to Method 4.
Method 4: Evaluate the Charger and Replace if Needed (5–20 minutes)
Diagnosing the Issue
Chargers often fail silently. Using an incorrect third‑party charger can also stop charging.
Fix Steps
- Confirm charger specs:
– V6/V7/V8 typically use ~26V chargers with specific connector barrel sizes from Dyson. V10/V11/V12/V15 also use Dyson-specific 26.1V chargers.
– Check label for output voltage/current to match your model. - Borrow or test with a known-working Dyson charger of the same model family.
- If you own a multimeter:
– Measure DC voltage at the charger plug; it should match the label. Zero or fluctuating voltage signals a bad charger.
Testing
- If the vacuum charges with a different charger, replace yours with a genuine Dyson charger to avoid compatibility/overheating issues.
Method 5: Address Battery Health and Replacement (10–30 minutes)
Diagnosing the Issue
Lithium-ion batteries degrade after 2–5 years (or 300–800 cycles). Symptoms:
– No charging light, or flashing red LED
– Charges but dies within seconds
– Only charges intermittently
– Battery gets unusually hot
Fix Steps
- Check LED codes (varies by model; consult your manual):
– Flashing red: battery fault in many models (V7/V8/V10/V11).
– Solid blue while docked: charging normally.
– No light: power path issue (charger/port/battery BMS). - If your battery is older than 3 years or shows red-flash errors, replace it.
– Important: Use genuine Dyson batteries for your exact model (V7 ≠ V8 ≠ V10, etc.). BMS and connectors differ.
– Power off, remove screws, slide battery out, install new battery, tighten screws. - First charge:
– Charge fully (typically 3–5 hours) before first use.
Testing
- You should see a stable blue charging light and normal runtime afterward. If not, continue.
Method 6: Firmware/Smart Model Reset and Thermal/Fuse Checks (10–25 minutes)
Note: Applies more to V11, V12 Detect, V15 Detect with LCD/LED diagnostics.
Diagnosing the Issue
Smart models can enter protective states after faults or overheating.
Fix Steps
- Soft reset:
– Remove the battery for 2 minutes, then reinstall. - Trigger reset:
– With the vacuum off the charger, press and hold the trigger for 10 seconds (battery installed), then release. - Clean filters:
– Severely clogged filters cause overheating, which can prevent charging. Wash and fully dry filters (24 hours) before reattempting. - Inspect for blockages:
– Clear the wand, brush head, and cyclone of obstructions.
Testing
- Reconnect to charger; check LCD/LED for normal charging indication.
- If still failing, the main control board or battery BMS may be faulty.
Model-Specific Notes

Dyson V6/V7/V8
- Batteries commonly fail with age; flashing red LED is typical of pack faults.
- Ensure you use the correct charger family.
- Filter and airway clogs can cause overheating and trigger protection.
Dyson V10/V11/V12/V15
- More sensitive to overheating and battery health; LCD may show error messages.
- Many have non-tool-free batteries but are still user-replaceable with Torx screws.
- Use only exact-match batteries; BMS communication must align.
LED Light Quick Guide
- Solid blue while charging: normal.
- No light: power not reaching the battery (outlet/charger/cable/contacts).
- Flashing blue: not charging properly—check connections or charger.
- Flashing red: battery fault; replacement usually required.
- Amber/orange: temporary fault or temperature out of range; let it cool/warm.
Refer to your model’s user manual or Dyson support page for exact LED meanings.
How to Prevent Future Charging Issues
- Use the original Dyson charger and dock only.
- Keep battery terminals clean and dry; avoid humid charging spots.
- Let the vacuum cool 15–30 minutes after heavy use before charging.
- Wash filters regularly and let them dry fully for 24 hours before reinstalling.
- Avoid fully draining the battery to 0% frequently; partial charges are okay.
- Store and charge in a room-temperature environment (60–75°F / 16–24°C).
- If storing long-term, leave the battery around 40–60% charge and charge monthly.
Pro Tips
- Label your charger by model to avoid mixing incompatible units.
- If wall mounting the dock, leave a little slack in the cable to prevent connector strain.
- Use a surge protector on the wall outlet to protect the charger from spikes.
- Periodically remove and reseat the battery to keep connections snug.
- If runtime drops quickly even after a full charge, run the vacuum without tools to isolate a shorting or high-draw attachment.
- For harsh water areas, after washing filters, give them extra time to dry; damp filters can trigger thermal faults and prevent charging.
- Keep firmware up to date on smart models if Dyson provides updates via service.
When to Call a Professional
- Persistent flashing red LED after trying a new, genuine battery.
- No charging light with multiple known-good chargers and outlets tested.
- Physical damage to the charging port, dock contacts, or internal wiring.
- Burning smell, scorch marks, or excessive heat during charging.
- LCD or LED shows repeated error codes you can’t clear.
What to look for in a service provider:
– Dyson-authorized service center or tech with experience in your exact model line.
– Genuine parts warranty (typically 6–12 months).
– Clear diagnostic fee and quote before repair.
Typical costs (may vary by region):
– Genuine charger: $30–$60
– Genuine battery: $60–$130 (higher for V11/V12/V15)
– Board/electronics repair: $80–$180
– Dock replacement: $20–$40
Warranty considerations:
– Dyson batteries and chargers are often covered under the product’s warranty period (2 years common for many models). Using third-party parts can void coverage.
FAQ
Q: Why is my Dyson not charging but the light is on?
A: If the light is on but the vacuum won’t power up later, the battery could be failing and not accepting full charge. Try timing a full charge (3–5 hours), then test runtime. If it dies quickly, replace the battery.
Q: What does a flashing red light mean on Dyson stick vacuums?
A: Typically a battery fault. Reseat the battery, let it cool, and try again. If it continues to flash red, the battery likely needs replacing with a genuine unit matched to your model.
Q: Can I use a third-party battery or charger?
A: It’s risky. Many third-party parts have incompatible protection circuits or voltages that prevent charging or reduce lifespan. For safety and performance, use genuine Dyson parts.
Q: How long should a Dyson stick vacuum battery last?
A: Generally 2–5 years depending on usage, environment, and charge habits. Heavy use on Boost/Max and frequent full discharges shorten lifespan.
Q: The charger shows power but my Dyson has no lights when docked. What now?
A: Try charging directly (bypass the dock). Clean and realign dock contacts. If it charges directly but not on the dock, replace or remount the dock.
Q: My Dyson gets hot and then won’t charge—why?
A: Thermal protection can block charging if the battery or motor is hot. Let it cool 30 minutes. Clean filters and check for clogs to prevent overheating.
Q: Do filters affect charging?
A: Indirectly. Clogged filters increase motor load and heat, triggering thermal protection that can prevent or interrupt charging. Keep filters clean and fully dry.
Q: How long does a full charge take?
A: Typically 3–5 hours depending on model and battery capacity. If it never reaches full after 6 hours, suspect a battery or charger fault.
Alternative Solutions
If fixing the charging issue isn’t cost-effective, consider these options:
| Solution | Pros | Cons | Best For |
|---|---|---|---|
| Replace with new genuine battery | Restores runtime, cheaper than new vacuum | Costly vs third-party | Batteries older than 3 years with red-flash errors |
| Professional board repair | Saves vacuum if electronics failed | Turnaround time, cost | Out-of-warranty units with known good battery/charger |
| Upgrade to newer model (V12/V15) | Longer runtime, better filtration, digital diagnostics | Highest cost | Heavy users needing reliability and support |
| Use a spare battery (where supported) | Minimizes downtime | Requires compatible model and extra cost | Large homes/extended cleaning sessions |
Get Your Dyson Stick Vacuum Working Again
Following this guide, you now have multiple solutions to fix your Dyson stick vacuum not charging:
– Quick checks on outlet, charger, and dock
– Contact cleaning and battery reseating
– Charger verification and safe replacement
– Battery health assessment and replacement
– Smart model resets, cooling, and filter maintenance
– Professional repair options when needed
Don’t let charging issues sideline your cleaning. Start with the simple steps and work down the list—most problems are solved by reseating the battery, cleaning contacts, or replacing a failing battery with a genuine part. If you’re still stuck, a Dyson-authorized service center can diagnose electronics quickly.
Have you fixed your Dyson stick vacuum not charging? Share what worked for your model in the comments to help other readers. Found this helpful? Bookmark it for future reference—proper care will keep your Dyson charging smoothly for years.