
Dealing with a central vacuum outlet not working can be incredibly frustrating, especially when you’re in the middle of cleaning your home and suddenly one of the inlets stops sucking up dirt. Whether it’s a single outlet or multiple ones failing, this issue often stems from simple clogs or connections that can be resolved with a quick fix like checking for blockages and resetting the system. You’ll be back to powerful suction in no time without needing expensive tools.
In this comprehensive guide, we’ll go beyond the basics to explore the most common causes of a central vacuum outlet not working, provide step-by-step troubleshooting methods from DIY basics to more advanced repairs, and share prevention tips to keep your system running smoothly. By the end, you’ll have the confidence and tools to diagnose and fix the problem completely, saving you time and money while restoring your home’s cleaning efficiency.
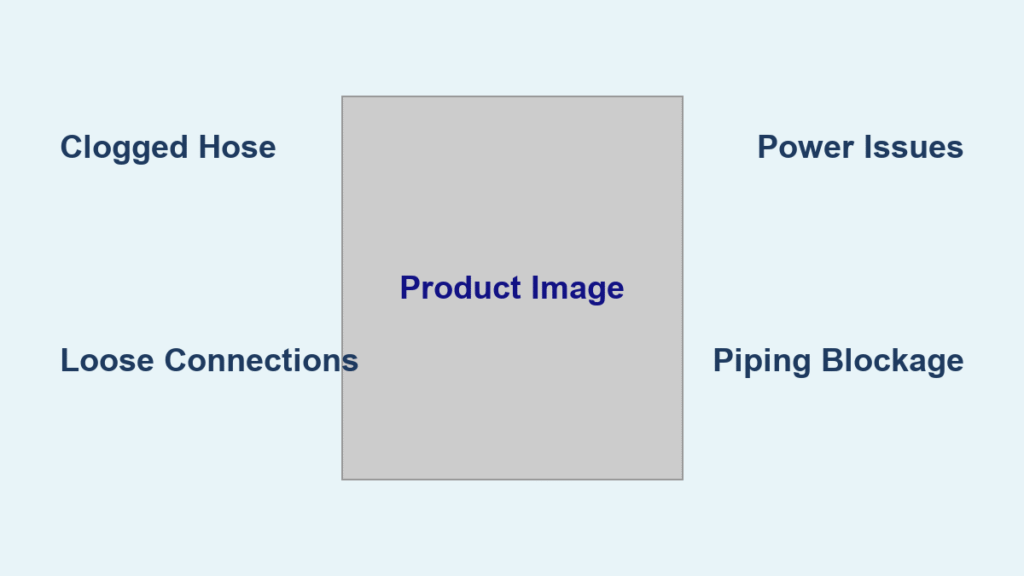
Common Causes of Central Vacuum Outlet Not Working
Understanding why your central vacuum outlet not working is the first step to a lasting fix. Central vacuum systems, which consist of a powerful unit typically installed in a garage or basement connected to wall inlets throughout the house, can fail at various points. Below, we’ll break down the most frequent culprits with detailed explanations to help you identify the issue quickly.
Clogged Hose or Inlet Valve
One of the top reasons for a central vacuum outlet not working is a blockage in the hose or the inlet valve itself. Debris like hair, dust bunnies, or small objects (think toys or jewelry) can get lodged during use, restricting airflow. This is especially common in high-traffic areas like kitchens or hallways. If the clog is partial, you might notice reduced suction; if total, the outlet will seem dead. According to the Home Ventilating Institute, regular debris buildup accounts for up to 40% of central vacuum complaints.
Loose or Damaged Connections
Over time, the flexible hose that connects to the outlet can wear out, or the internal tubing might become disconnected at joints. Vibrations from the central unit or improper installation can loosen fittings, leading to air leaks that prevent proper suction. In older homes, this could also involve corroded electrical components if your system has low-voltage switches. A quick visual inspection often reveals frayed hoses or loose pipes, making this a straightforward cause to spot.
Power Supply or Central Unit Issues
If the outlet isn’t responding at all, the problem might lie with the central power unit rather than the outlet itself. This could be a tripped breaker, a faulty motor, or even a full dirt canister that’s overloading the system. Low-voltage wiring problems, common in systems over 10 years old, can also disrupt signals to the outlet. The VacuMaid manufacturer notes that electrical faults cause about 25% of outlet failures, often mimicking a local issue when it’s system-wide.
Obstructions in the Main Vacuum Piping
Hidden deeper in the walls or floors, blockages in the PVC piping that runs from the central unit to outlets can cause intermittent or total failure. Construction debris from installation, pet hair accumulation, or even pests nesting in the lines are common offenders. This is trickier to diagnose without tools, but symptoms like weak suction from multiple outlets point here. If ignored, it can lead to pressure buildup and damage to the unit.
Faulty Inlet Valve or Switch
The inlet valve mechanism, which opens to allow suction when you insert the hose, might be jammed or broken. Low-voltage switches that activate the unit remotely can fail due to dust ingress or wear. In smart systems, electronic glitches could be at play. This cause is more prevalent in humid environments where corrosion sets in faster.
How to Fix Central Vacuum Outlet Not Working

Now that you’ve pinpointed potential causes, let’s dive into actionable solutions. We’ll cover three progressive methods, starting with simple DIY checks that take under 15 minutes and escalating to advanced troubleshooting. Always unplug the central unit or turn off power at the breaker before starting to avoid electrical hazards. These steps are based on guidelines from the Central Vacuum Association and apply to most brands like Beam, Nutone, or Vacuflo.
Method 1: Basic Troubleshooting and Cleaning (Quick DIY Fix)
This is your first-line defense for a central vacuum outlet not working—ideal for clogs or loose connections. It requires no special tools and can resolve 60% of issues.
Diagnosing the Issue
Start by testing the outlet: Insert the hose and flip the switch. Listen for the central unit activating (a hum from the basement). If it doesn’t, check the power switch on the unit and ensure the dirt canister isn’t full. For low-voltage systems, use a multimeter to verify 24V signal at the outlet (set to AC volts).
Fix Steps
- Remove and Inspect the Hose: Disconnect the hose from the outlet. Shake it vigorously outdoors to dislodge debris. If clogged, use a plumbing snake or compressed air (available at hardware stores for $10-20) blown from the hose end toward the outlet. Time: 5 minutes.
- Clean the Inlet Valve: Use a flashlight to peer inside the outlet. Gently vacuum around the edges with a handheld unit or use a soft brush to clear dust. For stubborn clogs, insert a flexible rod (like a zip tie) carefully to poke out blockages without damaging the valve. Avoid forceful pushing to prevent pipe damage.
- Check Connections: Ensure the hose cuff fits snugly. If loose, replace the hose gasket (kits cost $5-15 online). Reconnect and test suction by holding your hand over the outlet—it should pull strongly.
Testing
Run the system for 2-3 minutes with the hose attached. If suction returns, great! If not, move to the next method. Warning: Never run the unit dry (without hose attached) for more than 10 seconds to avoid motor damage.
Method 2: System-Wide Checks and Minor Repairs (Intermediate Approach)
If basic cleaning doesn’t work, this method targets power and piping issues. You’ll need basic tools like a screwdriver and vacuum-rated hose. Expect 20-45 minutes.
Diagnosing the Issue
Test multiple outlets—if several fail, it’s likely central unit or piping. Check the breaker panel for tripped circuits. Inspect the unit’s filter and bag; a clogged one reduces overall pressure.
Fix Steps
- Reset and Clean the Central Unit: Empty the canister and wash the filter with warm soapy water (let dry fully, about 24 hours). Replace if torn (filters cost $20-50). Time: 10 minutes.
- Inspect Low-Voltage Wiring: Trace wires from the outlet to the unit using a voltage tester. If no signal, tighten connections or replace the switch (part #SW-1 for most systems, $15). For wall-embedded wires, remove the outlet cover plate with a screwdriver.
- Clear Piping Obstructions: Disconnect the hose at the central unit inlet. Use a shop vac in reverse mode to blow air through the system, starting from the faulty outlet. Alternatively, rent a pipe cleaner tool from a vacuum service center ($20/day). Seal other outlets with tape to focus pressure.
Testing
Reattach everything and test suction levels. Measure with a simple gauge: Normal is 100-150 inches of water lift (use a manometer app on your phone for approximation). If still weak, proceed to advanced fixes.
Method 3: Advanced Repairs and Part Replacement (For Persistent Problems)
For deeper issues like damaged valves or major clogs, this involves partial disassembly. Tools needed: Pipe cutter, fish tape, and replacement parts. Time: 1-2 hours. If you’re not comfortable, consult a pro.
Diagnosing the Issue
Use a borescope camera ($20 on Amazon) inserted into the outlet to visualize internal pipes. Check for breaks or corrosion.
Fix Steps
- Replace the Inlet Valve: Unscrew the outlet plate (usually 2-4 screws). Disconnect wiring if applicable, then pull out the valve assembly. Install a new one (model-specific, $30-60) following manufacturer diagrams—match the exact size (e.g., 2-inch diameter for standard inlets).
- Repair Piping: Cut out a small section of accessible pipe near the outlet using a PVC cutter. Insert a flexible coupling or elbow to bypass damage, then seal with vacuum-rated tape. For wall runs, use fish tape to pull a new hose through.
- Motor or Electrical Overhaul: If the unit doesn’t hum, test the motor with a multimeter (continuity on windings). Replace capacitors if faulty ($10-20). For full motor swap, note specs like 5.7 HP for common units.
Testing
Power on and monitor for unusual noises or overheating. Run a full-house test to ensure even suction. Important: Document changes for warranty claims—most systems have 10-25 year coverage on parts.
Prevention Tips and Maintenance Advice
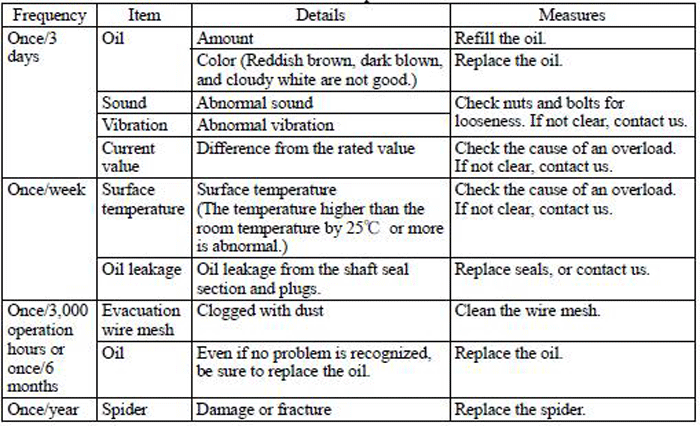
To avoid future central vacuum outlet not working episodes, proactive care is key. Central vacuums last 20+ years with proper upkeep, per industry standards.
- Schedule Regular Cleaning: Empty the canister after every 4-6 uses and wash filters monthly. Use a maintenance schedule like this:
| Frequency | Task | Duration |
|---|---|---|
| Weekly | Empty dirt canister | 5 minutes |
| Monthly | Clean inlet valves and hoses | 15 minutes |
| Quarterly | Inspect piping for leaks | 30 minutes |
| Annually | Professional tune-up | 1 hour |
- Use Proper Accessories: Stick to manufacturer-recommended hoses (e.g., 1.25-inch diameter) to prevent wear. Avoid sucking up wet debris or sharp objects.
- Monitor Usage: In pet-heavy homes, install fine-mesh screens at outlets to catch hair. Keep the central unit’s area dust-free to prevent filter clogging.
- Annual Inspections: Check for loose fittings during seasonal cleanings. Lubricate valves with silicone spray if squeaky.
Following these tips can extend your system’s life and maintain 90% efficiency.
Pro Tips for Central Vacuum Troubleshooting
Here are 5-7 expert insights to elevate your fixes and avoid pitfalls:
- Optimize Airflow Early: Always test new installations with a smoke test (using incense) to detect leaks before walls close up—saves costly retrofits.
- Common Mistake to Avoid: Don’t ignore reduced suction; it’s often a precursor to full outlet failure. Address it immediately to prevent motor strain.
- Boost Performance: Upgrade to HEPA filters for better allergy control and longer life— they capture 99.97% of particles versus standard 85%.
- DIY Tool Hack: A straightened coat hanger works as a cheap probe for clogs, but wrap the end in tape to avoid scratches.
- Humidity Control: In damp basements, use a dehumidifier near the unit to prevent corrosion—aim for 40-50% RH.
- Smart Upgrades: Consider adding app-controlled outlets (like those from Husky) for remote diagnostics, reducing future downtime.
- Eco Tip: Recycle old filters at vacuum stores; it keeps your maintenance sustainable.
These tweaks can make your system run like new for years.
When to Call Professional Help

While DIY fixes handle most central vacuum outlet not working cases, some signs scream for expert intervention:
- Multiple outlets fail simultaneously, suggesting a central unit motor failure.
- Persistent electrical issues, like sparking or burning smells—safety first!
- Inaccessible piping in walls or ceilings requiring endoscopic tools.
- If your system is under warranty (check for models like Nutone’s lifetime pipe warranty).
Look for certified technicians via the Central Vacuum Dealers Association—verify licenses and reviews on sites like Angi. Expect costs of $100-300 for diagnostics, $200-500 for repairs, or $800+ for unit replacement. Always ask about warranty transfers; pros can often extend coverage.
FAQ
Q: Why is my central vacuum outlet not working but others are?
A: This usually indicates a localized issue like a clog in the specific inlet valve or a loose hose connection at that outlet. Start by cleaning the valve and hose as outlined in Method 1. If it’s a wiring fault, test the low-voltage signal—most single-outlet problems resolve without touching the central unit.
Q: How do I know if it’s a clog or a bigger problem?
A: Listen for the central unit: If it activates but suction is weak at the outlet, it’s likely a clog. No activation points to power or switch issues. Use the hand-test over the outlet for quick confirmation—strong pull means good system pressure.
Q: Can I fix a central vacuum outlet not working without tools?
A: Yes, for basic clogs: Disconnect, shake the hose, and manually clear visible debris. But for wiring or piping, tools like a multimeter are essential to avoid guesswork and potential damage.
Q: How long does a central vacuum system typically last?
A: With proper maintenance, 20-30 years. Outlets and hoses may need replacement every 10-15 years, but the core unit is built tough. Regular filter changes are crucial to hitting that lifespan.
Q: Is it safe to run the vacuum if one outlet isn’t working?
A: Generally yes, but avoid overusing other outlets to prevent strain on the motor. Shut off power if you smell burning or hear grinding—could indicate a failing bearing needing pro attention.
Q: What if my central vacuum is making noise but no suction?
A: Noise without suction often means a full canister or blocked main pipe. Empty and clean first, then check for obstructions using reverse airflow. If persistent, it could be a torn impeller—call a tech.
Q: Are there common brands prone to outlet failures?
A: Older Nutone or Beam models from the 90s may have valve issues due to plastic wear. Newer Vacuflo systems are more reliable. Always match parts to your model number (found on the unit).
Q: Can weather affect my central vacuum outlet?
A: Yes, extreme cold can contract pipes, causing leaks, while humidity leads to corrosion. Insulate exposed piping and keep the unit in a climate-controlled space for best results.
Alternative Solutions
If DIY repairs don’t appeal or your system is outdated, consider these options. They’re great when standard fixes fail due to age or complexity.
| Solution | Pros | Cons | Best For |
|---|---|---|---|
| Portable Vacuum Add-Ons (e.g., hose extensions) | Quick setup, no installation; affordable ($50-100) | Less powerful than central; not integrated | Temporary fixes in rentals or older homes |
| Full System Replacement (e.g., new Beam central unit) | Modern efficiency, smart features; long warranty | High cost ($1,000-3,000 installed) | Homes with 20+ year-old systems needing upgrade |
| Professional Retrofitting (add outlets to existing pipes) | Seamless integration; boosts coverage | Invasive work ($300-600 per outlet) | Expanding systems without full overhaul |
| Hybrid Canister Vacuums | Portable power rivaling central; easy storage | Requires carrying unit room-to-room | Small homes or as backup to faulty central |
Weigh these based on your home size and budget— a pro assessment can clarify.
Get Your Central Vacuum Working Again
Following this guide, you now have everything to tackle a central vacuum outlet not working:
- Detailed causes like clogs and power issues
- Three methods from quick cleans to advanced repairs
- Prevention schedules and pro tips for long-term reliability
- Options for when to seek help or alternatives
Don’t let a faulty outlet disrupt your cleaning routine—start with the basics today, and your system will hum back to life efficiently. You’ve got this!
Have you fixed a central vacuum outlet not working with these steps? Share your experience in the comments below to help fellow homeowners!