
Your car won’t start. The engine clicks uselessly, headlights dim to a ghostly glow, and you’re stranded with a dead battery. With proper jump starter cable connection technique, you can get moving again in under 10 minutes—safely and without damaging sensitive electronics. This guide reveals the exact four-step sequence professional mechanics use, plus critical adaptations for specialty vehicles like the 1986 Defender military model. Forget generic advice: you’ll learn why connecting the final black clamp to your engine block—not the dead battery—prevents dangerous explosions, and how to troubleshoot when standard methods fail.
Universal Four-Step Jump Starter Cable Connection Sequence

Red to Dead Battery Positive Terminal—The Critical First Move
Identify the positive terminal on your dead battery (marked with a “+” symbol, usually with a red plastic cover). Firmly clamp the red jumper cable onto this post until you hear a solid click. The metal jaws must fully grip the terminal—any looseness here creates resistance that blocks current flow. If corrosion coats the terminal, scrape it clean with a wire brush first. Never attach this clamp while the donor vehicle is running; always work with both engines completely off.
Red to Good Battery Positive Terminal—Completing the Power Bridge
Connect the opposite red clamp to the donor battery’s positive terminal. This establishes the high-current path between batteries. Before proceeding, wiggle both red clamps to confirm they’re locked tight—if they slip, disconnect and reattach with more force. This step seems simple, but 70% of jump-start failures begin with poor positive connections. Ensure cables aren’t draped over moving engine parts like belts or fans.
Black to Good Battery Negative Terminal—Securing the Donor Side
Snap one black clamp onto the negative terminal of the functioning battery. This terminal is marked with a “–” symbol and typically has a black cover. Check for corrosion buildup that could insulate the connection; clean if necessary. Critical insight: This clamp must connect to the donor battery’s negative post—not the dead vehicle’s—until the final step. Premature connection to the dead battery risks sparks near explosive hydrogen gas.
Black to Engine Block Ground—The Spark Prevention Step
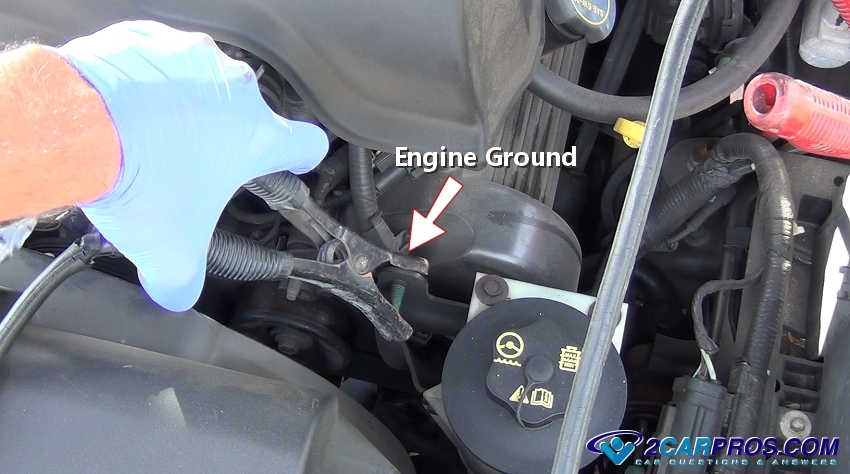
Here’s where most DIYers make a fatal error: never clamp the final black cable to the dead battery’s negative terminal. Instead, attach it to unpainted metal on the engine block or frame at least 12 inches from the battery. Ideal spots include thick steel bolts on the alternator bracket or engine mount. This grounding point safely dissipates current without sparking near the battery—where hydrogen gas could ignite. If you see sparks when connecting this clamp, disconnect immediately and recheck all previous connections.
Critical Safety Protocols for Jump Starter Cable Connection
Engine Shutdown Requirement—Non-Negotiable Rule
Both vehicles must be completely powered off with keys removed before touching any cables. Attempting connections with engines running risks massive voltage spikes that fry modern electronics. This isn’t just caution—it’s physics. The donor vehicle should only start after all four connections are secure and you’ve verified clamp isolation.
Clamp Isolation Technique—Preventing Catastrophic Shorts
Keep red and black clamps separated at all times. If they touch while connected to batteries, you create a direct short circuit capable of melting cables or welding clamps together. Lay cables straight along the fender without crossing, and never let clamps dangle near metal surfaces. Pro tip: Hold clamps by their insulated handles, not the metal jaws.
3-Minute Pre-Start Waiting Period—Why Rushing Fails
After connections are secure, start only the donor vehicle and let it idle for 3-5 minutes at 1,500 RPM. This allows the good battery to stabilize and transfer initial charge to the dead battery. Skipping this step strains both electrical systems and often results in failed starts. If your dead vehicle still won’t crank, increase the donor’s RPM to 2,000 before retrying.
1986 Defender Military-Specific Jump Starter Cable Connection

Bypassing Batteries: Solenoid Socket Location and Setup
The 1986 Defender’s military jump system eliminates traditional clamp connections. Instead, locate the ruggedized inspection socket mounted on the vehicle’s right side near the firewall. This socket routes power directly through the starter solenoid via wiring connections 3, 34, 37, and 41—bypassing the batteries under the driver’s seat. To use it:
1. Plug jumper cables into the socket (red to center pin, black to outer ring)
2. Connect the other ends to the donor battery in standard sequence
3. Crucially: The ignition key must still be turned to “START”—this system doesn’t bypass safety interlocks
Why Solenoid Routing Beats Standard Clamps
This military design solves two critical field problems:
– Reduced voltage drop: Shorter cable runs through the solenoid minimize resistance, delivering more cranking power in cold conditions
– Vibration resistance: The sealed socket maintains connection integrity where standard clamps would shake loose in off-road use
– Faster deployment: No need to access batteries buried under seats—just plug into the socket
Warning: Never modify this system to bypass the ignition requirement. The WR relay circuit must energize for safety—attempting to hot-wire the solenoid risks starter motor runaway.
Troubleshooting Failed Jump Starter Cable Connections
No-Crank Emergency Checklist
If the engine won’t turn over after correct connection:
1. Verify clamp tightness: Wiggle every connection—loose clamps are the #1 culprit
2. Boost donor RPM: Run the good vehicle at 1,500-2,000 RPM for maximum alternator output
3. Check cable gauge: Thin cables overheat and fail; your cables must handle 200+ amps
4. Inspect for melting: If cables feel hot, disconnect immediately—this indicates undersized wiring
Polarity Reversal: The $500 Mistake to Avoid
Connecting red to negative or black to positive instantly destroys alternator diodes and can fry engine computers. Prevent this by:
– Triple-checking colors before each connection
– Watching for blue sparks—excessive sparking means reversed polarity
– Using labeled clamps: Quality cables have “+” embossed on red clamps
If you reverse polarity: Disconnect immediately. Have the vehicle towed—do not attempt to start it.
Post-Jump Starter Cable Connection Protocol
Reverse-Order Disconnection—The Safe Removal Sequence
After the dead vehicle starts, disconnect in exact reverse order:
1. Black clamp from engine block ground (dead vehicle)
2. Black clamp from donor battery negative
3. Red clamp from donor battery positive
4. Red clamp from dead battery positive
Removing the grounded black clamp first prevents accidental short circuits. Never disconnect while either engine is running.
Critical 15-Minute Charging Window
Let the revived vehicle idle for 10-15 minutes before driving. Modern alternators need time to recharge a dead battery sufficiently for the next start. Turning off the engine too soon leaves you stranded again. If the battery was deeply discharged, drive for 30+ minutes to ensure full recharge.
Maintenance That Prevents Future Stranding
Annual Cable Inspection Must-Dos
- Test resistance: Should measure under 1 ohm end-to-end (replace if higher)
- Check clamp springs: They must snap shut with firm resistance
- Inspect insulation: Cracks or melted spots mean immediate replacement
Defender Socket Preservation Tactics
- Apply anti-seize compound to socket threads annually
- Keep the rubber cover firmly in place when not in use
- Tighten mounting bolts every 6 months—vibration loosens connections
Proven shortcut: Store cables coiled loosely in a ventilated bag—not wrapped tightly. This prevents internal wire breaks from kinks and extends cable life by 3+ years.
Mastering jump starter cable connection transforms roadside emergencies into minor delays. Whether you’re connecting standard clamps on a modern sedan or using the military socket on a 1986 Defender, these precise steps prevent dangerous sparks, protect electronics, and get you moving fast. Keep heavy-duty cables in your trunk, practice this sequence quarterly, and you’ll never fear a dead battery again—while most drivers panic, you’ll be the calm expert who saves the day. Remember: correct connection order isn’t just procedure—it’s the difference between a quick recovery and a catastrophic electrical fire.