
When your Xiaomi Vacuum 2 isn’t charging, it can derail your whole cleaning routine. Whether it’s the Mi Robot Vacuum-Mop 2, 2 Pro/Pro+, or Roborock S5/S6-series variant often grouped as “Xiaomi Vacuum 2,” the most common culprits are simple: dirty contacts, misaligned docking, a drained battery stuck in protection mode, or a faulty charger. Quick fix: clean the charging contacts on both the vacuum and dock with isopropyl alcohol, reseat the charging cable and power brick, then hard reboot the robot. In many cases, this restores charging immediately.
In this comprehensive guide, you’ll learn every proven solution—from fast fixes to advanced troubleshooting—for Xiaomi Vacuum 2 models not charging. We’ll cover causes, step-by-step methods, hidden settings, battery checks, and prevention. By the end, you’ll know exactly how to get your robot back on the dock and charging reliably.
Common Causes of Xiaomi Vacuum 2 Not Charging
- Dirty or oxidized charging contacts on robot or dock
- Misaligned docking or blocked infrared sensors
- Loose or faulty power adapter, cable, or wall outlet
- Dock placement issues (uneven floor, carpet edge, sunlight interference)
- Firmware glitches or robot “hung” state preventing charge handshake
- Battery in deep discharge/protection mode
- Damaged dock pins or compressed/bent contacts
- Internal battery aging or failure (2–4 years typical lifespan)
- App settings or region/voltage mismatches
- Environmental interference: strong sunlight on dock sensors, magnetic strips, base too close to obstacles
How to Fix Xiaomi Vacuum 2 Not Charging
Method 1: Quick Dock and Contact Reset
Estimated time: 5–10 minutes
Diagnosing the Issue
- Robot docks but no charging icon or voice prompt.
- App shows “Not charging” or battery doesn’t increase over time.
- Dock light off or blinking abnormally.
Fix Steps
-
Power check
– Unplug the dock power adapter from the wall for 30 seconds.
– Plug into a known-good outlet. Avoid surge protectors with switches.
– Confirm dock LED is on (varies by model; some docks have subtle indicators). -
Clean charging contacts
– Turn the robot upside down on a towel.
– Clean the two charging pads on the robot and the two spring-loaded pins on the dock with a microfiber cloth lightly dampened with 70–90% isopropyl alcohol.
– Remove any hair/dust around the pins and side brush area.
– Let dry 1–2 minutes. -
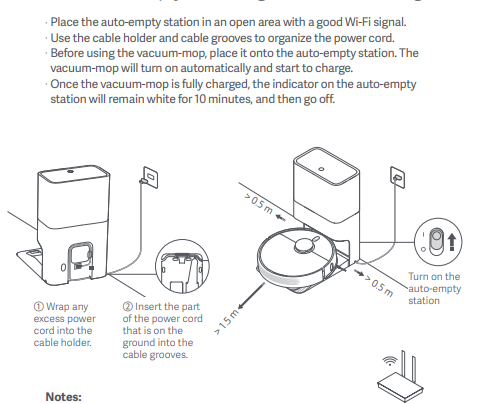
Level and position the dock
– Place the dock on a hard, flat surface.
– Keep 0.5 m (1.5 ft) clear on each side and 1.5 m (5 ft) in front.
– Avoid direct sunlight hitting the dock or robot sensors. -
Redock the robot
– Position the robot 10–20 cm from the dock, facing it, then press the Home/Dock button to auto-dock.
– Watch for the charging icon in the app or on the robot screen/LED.
– Listen for the “Charging” voice prompt if available.
Testing
- Leave on dock 15–30 minutes. Battery percentage should rise at least 3–10%.
- If charging resumes, you’re done. If not, continue to Method 2.
Method 2: Hard Reboot and Adapter Verification
Estimated time: 10–15 minutes
Diagnosing the Issue
- Dock power light is on, contacts are clean, but robot still not charging.
- App glitches or robot unresponsive.
Fix Steps
-
Verify adapter and cable
– Confirm adapter specs: most Xiaomi Vacuum 2 docks use 20V DC output (check label on brick).
– Ensure cable is fully inserted into dock jack.
– Try a different wall outlet.
– If you have a spare compatible adapter, test it. -
Hard reboot robot
– Hold the power button for 10–15 seconds until the robot powers off.
– Wait 30 seconds, then press power to turn on.
– Optionally press and hold Dock/Home + Power (varies by model) for a soft reset without wiping maps.
– Check the app reconnects. -
Redock using button
– Place robot near dock and press Home/Dock to initiate docking sequence.
Testing
- Monitor charge level for 15 minutes. If still no charge, proceed to Method 3.
Method 3: Sensor and Alignment Troubleshooting
Estimated time: 15–25 minutes
Diagnosing the Issue
- Robot approaches dock but fails to align or backs away.
- Sunlight or reflections near dock.
- Thick carpets or uneven floors.
Fix Steps
-
Clear the docking area
– Remove obstacles: rugs with fringes, cables, reflective metal surfaces.
– Avoid placing the dock on thick carpet or uneven thresholds. -
Clean front sensors
– Wipe the robot’s front IR/laser sensors and cliff sensors with a dry microfiber cloth.
– Remove dust build-up that can prevent the robot from seeing the dock. -
Check dock pins
– Press the spring-loaded pins on the dock—they should move freely and spring back.
– If stuck, gently clean around them with a dry brush; avoid excessive liquid. -
Manual alignment test
– Gently push the robot so its pads contact the dock pins firmly.
– If it begins charging only when you apply pressure, the springs or contacts may be worn or compressed.
Testing
- Repeat auto-docking. If manual pressure is needed, consider contact pad replacement or dock repair (see Professional Help section).
Method 4: Battery Recovery (Deep Discharge/Protection Mode)
Estimated time: 30–90 minutes
Diagnosing the Issue
- Battery shows 0% or “– –” and won’t start charging.
- Robot was unused for weeks/months or fully drained during storage.
- No charging indicator despite correct setup.
Fix Steps
-
Extended dock time
– Leave the robot seated on the dock for 60–90 minutes even if no indicator appears.
– Some BMS (battery management systems) need time to wake from protection mode. -
Warm-start charging
– Ensure the room is 15–30°C (59–86°F). Extremely cold batteries may refuse to charge.
– Try again after the robot acclimates. -
Power-cycle dock during contact
– With the robot fully seated, unplug the adapter from wall for 5 seconds, plug back in.
– This can retrigger the handshake. -
Partial manual charge (advanced users)
– If you have an original charger-only base (rare) or compatible bench supply, do not attempt unless you are experienced.
– Warning: Incorrect voltage/current risks damage. Safer route: contact service.
Testing
- If the battery percentage finally appears and increases, let it charge to 100% before use to re-balance the pack.
Method 5: Firmware, App, and Factory Reset
Estimated time: 20–40 minutes
Diagnosing the Issue
- App misreports battery or shows “charging” without actual increase.
- Robot behavior inconsistent after updates or network changes.
Fix Steps
-
App refresh
– Update the Mi Home or Roborock app to the latest version.
– Force close and reopen. Clear cache if available. -
Firmware update
– With the robot on the dock (or powered on), check for firmware updates in the device settings.
– Apply updates and reboot. -
Factory reset (last resort before hardware checks)
– Backup maps if supported.
– Use the model-specific button combo (often Power + Spot Clean or Dock for ~5–10 seconds) to reset.
– Re-add the device in the app and test charging.
Testing
- After reset/update, attempt docking and observe battery increase for 20–30 minutes.
Method 6: Hardware Inspection and Replacement
Estimated time: 30–60 minutes
Diagnosing the Issue
- Dock pins loose or broken, charging pads heavily worn.
- Battery age 2–4+ years, shorter runtimes, frequent 0–20% drops.
- Burning smell, swelling, or heat near battery bay (stop use immediately).
Fix Steps
-
Inspect for damage
– Look for bent pins, cracked pads, or melted plastic.
– Ensure side brush screws aren’t interfering with docking. -
Replace dock or adapter
– Try a known-good OEM dock/adapter compatible with your specific Xiaomi/Roborock model.
– Avoid third-party units with mismatched voltage. -
Replace battery (if out of warranty)
– Obtain an OEM or high-quality replacement battery specific to your model (e.g., 5200 mAh Li-ion pack common in S5/S6 class).
– Follow official teardown guides or seek professional service.
– Important: Disconnect battery before any internal work and avoid puncturing cells.
Testing
- After replacement, charge to 100% and perform a full cleaning cycle to calibrate the battery.
How to Prevent Future Charging Issues
- Keep contacts clean: wipe robot pads and dock pins monthly.
- Place dock on a hard, level surface away from direct sunlight.
- Maintain clearances: 0.5 m sides, 1.5 m front.
- Avoid running to 0% frequently; recharge when below 20–30%.
- Store the robot on its dock when not in use.
- Update firmware periodically.
- Every 3–6 months, inspect for dust build-up in sensors and vents.
- Replace batteries every 2–4 years depending on use.
Pro Tips
- Use a small artist’s brush to dust dock pins and the robot’s contact recesses without pushing debris deeper.
- If you have pets, add a quick weekly wipe of contacts; pet dander oxidizes metal faster.
- Don’t place the dock near mirrors, black carpets, or reflective chrome—these confuse IR sensors.
- Label the power adapter with the model it belongs to to avoid mix-ups with similar 20V chargers.
- For apartments with limited outlets, use a surge protector mounted off the floor to avoid accidental kicks loosening the plug.
- If the robot repeatedly docks but won’t charge unless pushed, the spring force may be weak—consider replacing the dock before the battery, as poor contact can mimic battery failure.
- After a full battery replacement, perform two full charge-discharge cycles to stabilize the BMS’s capacity estimate.
When to Get Professional Help
- The robot won’t power on even after 60–90 minutes on the dock.
- You smell burning, see swelling, or feel excessive heat from the battery area.
- Dock pins are stuck or broken, or pads are cracked.
- The robot only charges intermittently despite clean contacts and a known-good adapter.
- Firmware updates fail repeatedly or the unit won’t reset.
What to look for in a service provider:
– Authorized Xiaomi/Roborock repair center or a reputable robot vacuum specialist with model experience.
– Warranty support verification before any paid repairs.
– Clear diagnostic report and parts warranty (90 days or more).
Typical costs (varies by region/model):
– Replacement adapter: $20–$40
– Charging dock: $30–$60
– Battery replacement: $40–$90 parts, $30–$80 labor
– Board/port repair: $60–$150
Warranty considerations:
– Opening the robot can void warranty.
– Use OEM parts where possible.
– Keep purchase receipts and app/device serial handy.
FAQ
Q: Why does my Xiaomi Vacuum 2 dock but not charge?
A: The most common reason is poor contact—dirty pads or weak spring pins. Clean the contacts on both robot and dock, ensure the dock is on a flat, hard surface, and re-dock. Also verify the adapter is firmly connected and powered.
Q: How do I know if the battery is dead?
A: Signs include rapid drops from 100% to low percentages, short runtimes, inability to hold charge overnight, or failure to wake from 0% after 60–90 minutes on the dock. If contacts and dock are fine, the battery may need replacement after 2–4 years.
Q: Can firmware cause charging issues?
A: Sometimes. Glitches can misreport status or block charge negotiation. Update the app and firmware, then reboot the robot. A factory reset (after backing up maps) can clear persistent issues.
Q: My dock light is off. Is the dock dead?
A: Not all docks have obvious LEDs, but if yours usually lights and now doesn’t, check the outlet, adapter connection, and cable. Try a different outlet and inspect for damage. If still off, the adapter or dock may have failed.
Q: Does sunlight really affect charging?
A: Yes. Strong sunlight can blind the robot’s IR sensors, preventing proper alignment with the dock and causing docking failures that look like charging issues. Move the dock to a shaded, neutral surface.
Q: Is it safe to replace the battery myself?
A: If out of warranty and you’re comfortable with small electronics, it’s possible using an OEM-compatible battery and proper safety steps. Always disconnect power, avoid puncturing cells, and follow a reliable guide. Otherwise, seek professional service.
Q: How long should it take to start charging from 0%?
A: The robot should acknowledge charging within seconds, but if the battery is in protection mode, it might take 20–60 minutes before the percentage updates. Leave it on the dock undisturbed.
Q: Why does charging stop at 98–99%?
A: That’s normal—lithium-ion packs often trickle and hold near full, with minor fluctuations. If it never reaches 100% or drops rapidly after undocking, calibrate with a full run then full charge, or consider battery health.
Alternative Solutions
When standard docking isn’t possible or reliable, consider:
– Replacement dock: restores proper spring tension and alignment.
– Magnetic contact refurb kits or contact pad replacements (model-specific).
– External charging workaround kits (rare; not recommended unless OEM).
Pros and cons:
| Solution | Pros | Cons | Best For |
|---|---|---|---|
| New OEM Dock | Fixes worn pins, ensures compatibility | Cost vs simple cleaning | Worn or bent dock pins |
| New OEM Adapter | Cheap, quick swap | Won’t fix internal faults | Suspected power brick failure |
| Battery Replacement | Restores runtime, reliability | Requires opening robot | Aged batteries (2–4+ years) |
| Professional Repair | Safe, diagnostic certainty | Cost, downtime | Complex board/port issues |
Get Your Xiaomi Vacuum 2 Working Again
Following this guide, you now have multiple solutions to fix your charging issues:
– Quick wins: clean contacts, verify power, optimize dock placement
– Deeper fixes: hard reboot, firmware updates, sensor checks
– Advanced steps: battery recovery, hardware replacement, professional service
Don’t let a charging glitch sideline your cleaning. Try these methods in order, and you’ll likely have your Xiaomi Vacuum 2 charging reliably again in no time. Still stuck? Describe your model and symptoms in the comments for tailored advice.
Have you successfully fixed your Xiaomi Vacuum 2 not charging? Share your experience to help other readers troubleshoot faster!